Part 2: Planting Your Orchid
Now that your container has been prepared to receive your Just Add Ice Orchid (see our previous post), you’re ready to complete your orchid terrarium display project. Below we continue the project instructions with detailed directions on planting your orchid:
- Remove your Just Add Ice Orchid from its pot. Holding the orchid’s roots under gently running room-temperature water, gently remove potting soil.
- Trim off any rotting or damaged roots.
- Loosely pack the pre-soaked sphagnum moss into the spaces between the roots and around the outside edges of the plant’s roots, covering lightly but completely.
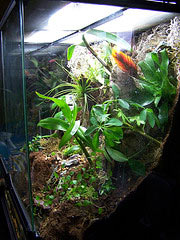
- Insert approximately 2 handfuls of sphagnum moss into the center of the prepared terrarium container and gently push down toward the rocks. Place the moss-wrapped roots of your orchid plant into the container. The leaves at the base of the orchid plant should partially clear the top lip of the vase. If you need to raise the height of the orchid, remove the plant and add more moss under the roots, then replace the orchid in the container.
- Look through the glass container. Using a chopstick or bamboo skewer, carefully cover any exposed roots with moss.
- Cover visible roots at the top of the container with adding sphagnum moss.
- If desired, your planting can be topped with a decorative layer of deer moss. A small figure, pretty rock or decorative shell can also be added if desired.
- To feed and water your orchid terrarium, mix 1 part orchid fertilizer to 4 parts water. Carefully pour into container until solution just covers the rocks and is barely touching the moss. Water with additional solution when the moss is completely dry to the touch.
Photo by: Holiday Hanson