
Get notified every time a new article comes out and
keep up with the latest plant care or plant trend.
Orchids are beloved by many for their captivating beauty and varied species. Among the fascinating aspects of these plants is the orchid keiki, a baby orchid that forms on the flower spike of a mature orchid. This guide will explore what does a keiki look like, keiki orchid care, and the process of how to remove a keiki from an orchid stem. Whether you're just starting your orchid journey or have been growing them for years, learning how to plant a keiki orchid can expand your collection with ease.
An orchid keiki is a little plantlet that emerges from the nodes of a mature orchid. It’s a natural propagation method, ensuring the genetic traits of the parent are passed down. Typically, keikis develop roots and leaves on the orchid, growing leaves on the stem, becoming independent when they're mature enough. Keikis are often triggered by stress factors like changes in light or humidity, acting as a survival mechanism for the plant.
While many orchid species can produce keikis, Phalaenopsis, Dendrobium, and Cattleya orchids are particularly prone to this form of reproduction. Understanding what does a keiki look like can help you identify these charming offshoots and start your journey into keiki orchid care.
Caring for your keiki orchidee is a rewarding experience. These young orchids thrive in warm, humid environments, ideally between 70°F and 80°F during the day, with slightly cooler nights. Bright, indirect light is key to avoiding damage to their delicate leaves. Proper watering and fertilization are crucial, keeping the potting medium slightly moist and using a balanced orchid fertilizer diluted to half strength every two to four weeks.
Identifying healthy keikis involves looking for vibrant green leaves and a firm appearance, while yellowing leaves and stunted growth indicate issues. Adjust your care routine accordingly to ensure your keiki orchids flourish.
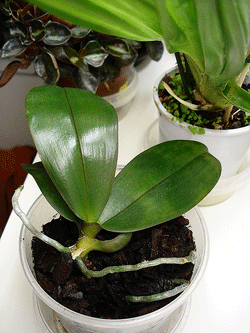
To expand your orchid collection, learning how to remove keiki from orchid stem and repotting it is essential. Follow these steps:
Step 1: Wait until the keiki has a few small leaves and roots that are two to three inches long. This ensures it's ready for transplanting.
Step 2: Use sterile cutting tools to cut the cane about two inches above and below the keiki, ensuring you do not damage the roots. Applying cinnamon or fungicide can prevent fungal infections.
Step 3: Let the keiki dry for a few hours before potting to prevent rot. Plant it in a four-inch pot using sphagnum moss, bark, or a commercial orchid potting mix. If using sphagnum moss, make sure it is damp before potting, tightly packing it around the keiki to provide support.
Plant the keiki in a four-inch pot, and use sphagnum moss, bark, peat moss, cork, or a commercial orchid potting mix as potting medium. If you choose to use sphagnum moss, make sure that it is damp before you start potting. Fill the bottom of the pot with some moss, and then, make a ball of moss that is a little bigger than the pot and wrap it around the keiki. The moss should be tightly packed into the pot to provide good support for the keiki. As the plant matures, you may consider switching to bark as your potting medium.
Position your newly potted keiki in a spot with indirect sunlight, gradually increasing the light exposure as it shows signs of growth.
As soon as you see signs of growth, you can start increasing the amount of light every few days. After your keiki is well-established and growing well, it can take the same amount of light as the mother plant.
Also, you should only add fertilizer after the leaves show signs of growth. It usually takes about two years for a keiki to become a mature flowering plant.
With proper keiki orchid care, your keiki will grow into a mature flowering plant in about two years, ready to enhance your orchid collection.

Copyright Just Add Ice® Orchids 2023