
Get notified every time a new article comes out and
keep up with the latest plant care or plant trend.
Today, we complete instructions on how to repot your Just Add Ice Orchid. See our previous post for steps 1 and 2.
3. To get as much as enjoyment from your Just Add Ice Orchid, wait until it is finished blooming to repot it. Before repotting, cut off any remaining flower spikes.
4. Carefully remove the orchid from its pot. If necessary, loosen the plant by running a dull knife along the inside edges of the pot. Lift the orchid from the pot and gently remove any old potting media that may be clinging to the orchid’s roots.
5. Carefully trim off any dead or dying roots. Dead roots will be brown and soft; whereas healthy roots will be firm and either white or green.
6. Gently place the orchid into its new container. The base of the plant’s lowest leaf should be about ½ inch below the rim of the new container.
7. Add new potting material around the orchid roots, tapping the pot periodically to settle the material. Do not compress material around the roots. Continue adding potting material until it reaches the base of the plant’s lowest leaf. When planting is completed, your Just Add Ice Orchid should be planted to the same depth as previously.
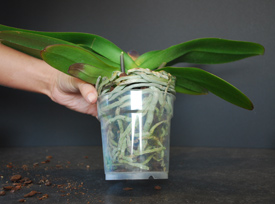
8. If you have repotted your orchid correctly, the plant should stay in the pot when you hold it by the stem and lift gently. If the plant separates from the pot, it was not packed tightly enough. Start over and try again.
9. For the next 10 days, do not add ice to water your orchid. Mist it lightly each morning and keep your orchid in a warm location. On the 10th day, you can return your Just Add Ice Orchid to its regular display space and re-start the normal watering schedule of 3 ice cubes once a week.

Copyright Just Add Ice® Orchids 2023