
Get notified every time a new article comes out and
keep up with the latest plant care or plant trend.
Owning a Phalaenopsis orchid is a rewarding experience. This type of orchid is easy to grow and with minimal effort, giving its owner beautiful and colorful flowers for several months. Some Phalaenopsis orchids will bloom once a year and some will have a second blooming cycle.
There does come a point in time where all Phalaenopsis orchids should be repotted to maintain good health and longevity of the plants’ lives. Repotting should only occur after the Phalaenopsis orchids flowering cycle is complete. If you want a strong orchid that will consistently rebloom, then the plant requires a strong root system. Phals require a great amount of air for their root system to breath, which is why repotting the orchid is so important.
Once the orchid is finished blooming, there are steps that should be taken to repot the Phalaenopsis orchid:
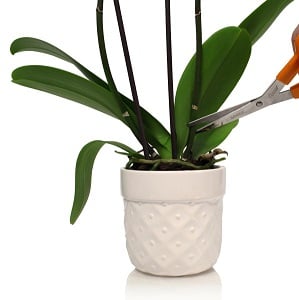
Why trim the spikes? Phalaenopsis orchids use the time that they are out of bloom to rest and gather energy for their next blooming cycle. A dried shriveled up spike, or even a green spike, is drawing energy that the orchid could be using in a more beneficial way.
Orchid spikes that have remained healthy and green can be trimmed one inch above the top node of the orchid spike. If the spikes have turned yellow or brown, trim one inch above the base of the plant.
Check back for our next post that will continue discussing the steps required to repot your orchid.

